
티스토리 뷰
728x90
[수업 목표]
- Javascript의 사용방식에 대해 이해하고 문법에 익숙해진다
- JQuery로 HTML을 조작할 수 있다
- Fetch로 서버 API에 데이터를 주고, 결과를 받아온다
07. [데일리모토] 시간 기능 구현하기
1) 코드스니펫 ChatGPT (https://chat.openai.com/auth/login) 를 실행해보자.

📌 ChatGPT 다양한 활용
- 코드 작성 도움: chatGPT는 코드 작성에 대한 도움을 받을 수 있어요! 원하는 프로그래밍 언어나 기술에 관련된 코드를 물어보면, 해당 코드를 작성하는 방법과 문제 해결에 도움이 되는 팁을 받을 수 있답니다.
- 개념 이해와 설명: chatGPT는 개념적인 질문에 대해서도 답변도 받을 수 있어요. 프로그래밍 개념, 알고리즘, 데이터 구조 등에 대한 궁금증을 해결하거나, 원하는 주제에 대한 설명과 예시를 제공 받을 수 있습니다.
- 문제 해결과 디버깅 지원: 개발 중에 발생하는 문제에 대해서도 chatGPT에게 도움을 받을 수 있어요. 버그나 오류 메시지에 대한 이해와 해결책을 제시 받을 수 있답니다.
- motto_js.html 로 파일을 만들고 전에 만들었던 데일리모토 motto.html 의 코드를 가지고 온다.
<!DOCTYPE html>
<html lang="en">
<head>
<meta charset="UTF-8" />
<meta http-equiv="X-UA-Compatible" content="IE=edge" />
<meta name="viewport" content="width=device-width, initial-scale=1.0" />
<title>Document</title>
<style>
body {
background-image: url("https://s3.ap-northeast-2.amazonaws.com/materials.spartacodingclub.kr/webjong/images/background.jpg");
background-position: center;
background-size: cover;
color: white;
}
.navbar {
display: flex;
justify-content: space-between;
align-items: center;
}
.weather {
display: flex;
align-items: center;
margin-right: 30px;
}
.container {
display: flex;
flex-direction: column;
/* Flex 안의 아이템들을 세로 방향으로 배치합니다. */
justify-content: center;
/* 주축 방향으로 가운데 정렬합니다. */
align-items: center;
/* 교차축 방향으로 가운데 정렬합니다. */
height: 100vh;
text-align: center;
}
.footer {
position: fixed;
left: 0;
bottom: 0;
width: 100%;
text-align: center;
font-weight: bold;
padding: 20px 0;
}
.greeting {
margin-bottom: 50px;
}
.motto {
margin-bottom: 100px;
}
.logo {
height: 32px;
margin-left: 30px;
}
</style>
</head>
<body>
<nav class="navbar">
<img class="logo"
src="https://s3.ap-northeast-2.amazonaws.com/materials.spartacodingclub.kr/webjong/images/sparta-logo.svg"
alt="" />
<div class="weather">
<p>날씨 맑음, 20ºC</p>
</div>
</nav>
<div class="container">
<div class="greeting">
<h1>Hello, My name!</h1>
<h1>12:30</h1>
</div>
<div class="motto">
<h3>My life's motto</h3>
<h2>웃으면 행복해집니다.</h2>
</div>
</div>
<div class="footer">
<p>- 작자 미상 -</p>
<p>멋진 명언입니다. 아이스크림을 먹으면 행복해져요.</p>
</div>
</body>
</html>

- </body> 코드 위에 챗지피티가 말한 코드를 복사 붙여 넣기한다.
- ✅ 코드에 대해 설명 드리겠습니다!
- **new Date()**를 사용하여 현재 시간을 가져옵니다.
- currentTime 은 자바스크립트에서 현재시간을 계속 변경해서 알려주는 코드
- getHours, getMinutes, getSeconds 메서드를 사용하여 현재 시간의 시, 분, 초를 추출합니다.
- 만약 분이나 초가 10보다 작으면, 앞에 0을 붙여주어 2자리 숫자로 표시합니다.
- 현재 시간이 오전인지 오후인지 판단하기 위해 hours 변수가 12보다 크거나 같은지 확인합니다. 만약 그렇다면 "PM"을, 아니라면 "AM"을 meridiem 변수에 할당합니다.
- 시간을 12시간 형식으로 변환하기 위해 hours 변수를 12로 나눈 나머지를 구합니다. 그리고 만약 **hours**가 0이 아니라면 그 값을, 0이라면 12를 hours 변수에 할당합니다.
- hours, minutes, seconds, **meridiem**을 결합하여 "HH:MM:SS AM/PM" 형식의 시간 문자열인 **timeString**을 생성합니다.
- "current-time"이라는 id를 가진 요소를 찾아서 innerHTML 속성을 사용하여 **timeString**을 표시합니다.
- 마지막으로 setInterval 함수를 사용하여 displayCurrentTime 함수를 1초마다 호출하여 시간을 업데이트합니다.
- **new Date()**를 사용하여 현재 시간을 가져옵니다.
- id="current-time" 이라고 하니 이름을 바꾸어준다.

<!DOCTYPE html>
<html lang="en">
<head>
<meta charset="UTF-8" />
<meta http-equiv="X-UA-Compatible" content="IE=edge" />
<meta name="viewport" content="width=device-width, initial-scale=1.0" />
<title>Document</title>
<style>
body {
background-image: url("https://s3.ap-northeast-2.amazonaws.com/materials.spartacodingclub.kr/webjong/images/background.jpg");
background-position: center;
background-size: cover;
color: white;
}
.navbar {
display: flex;
justify-content: space-between;
align-items: center;
}
.weather {
display: flex;
align-items: center;
margin-right: 30px;
}
.container {
display: flex;
flex-direction: column;
/* Flex 안의 아이템들을 세로 방향으로 배치합니다. */
justify-content: center;
/* 주축 방향으로 가운데 정렬합니다. */
align-items: center;
/* 교차축 방향으로 가운데 정렬합니다. */
height: 100vh;
text-align: center;
}
.footer {
position: fixed;
left: 0;
bottom: 0;
width: 100%;
text-align: center;
font-weight: bold;
padding: 20px 0;
}
.greeting {
margin-bottom: 50px;
}
.motto {
margin-bottom: 100px;
}
.logo {
height: 32px;
margin-left: 30px;
}
</style>
</head>
<body>
<nav class="navbar">
<img class="logo"
src="https://s3.ap-northeast-2.amazonaws.com/materials.spartacodingclub.kr/webjong/images/sparta-logo.svg"
alt="" />
<div class="weather">
<p>날씨 맑음, 20ºC</p>
</div>
</nav>
<div class="container">
<div class="greeting">
<h1>Hello, My name!</h1>
<h1 id="current-time">12:30</h1>
</div>
<div class="motto">
<h3>My life's motto</h3>
<h2>웃으면 행복해집니다.</h2>
</div>
</div>
<div class="footer">
<p>- 작자 미상 -</p>
<p>멋진 명언입니다. 아이스크림을 먹으면 행복해져요.</p>
</div>
<script>
// 시간 chatgpt
function displayCurrentTime() {
var currentTime = new Date();
var hours = currentTime.getHours();
var minutes = currentTime.getMinutes();
var seconds = currentTime.getSeconds();
// Add leading zeros to minutes and seconds if they are less than 10
minutes = (minutes < 10 ? "0" : "") + minutes;
seconds = (seconds < 10 ? "0" : "") + seconds;
// Determine if it's AM or PM
var meridiem = hours >= 12 ? "PM" : "AM";
// Convert to 12-hour format
hours = hours % 12;
hours = hours ? hours : 12;
// Display the time in HH:MM:SS format
var timeString = hours + ":" + minutes + ":" + seconds + " " + meridiem;
// Display the time in an element with id "current-time"
document.getElementById("current-time").innerHTML = timeString;
}
// Call the displayCurrentTime function every second to update the time
setInterval(displayCurrentTime, 1000);
</script>
</body>
</html>
08. 서버-클라이언트 통신 이해하기
- 서버-클라이언트: 'Json'을 이해하기

- 서울시 OpenAPI에 접속해보면 아래의 사진처럼 나온다. 그러면 어지러워 볼 수 없기 때문에 정렬해주기 위해서 크롬 익스텐션 JSONView를 설치한다.


- 설치하고 나면 위 사진처럼 정렬이 된다.
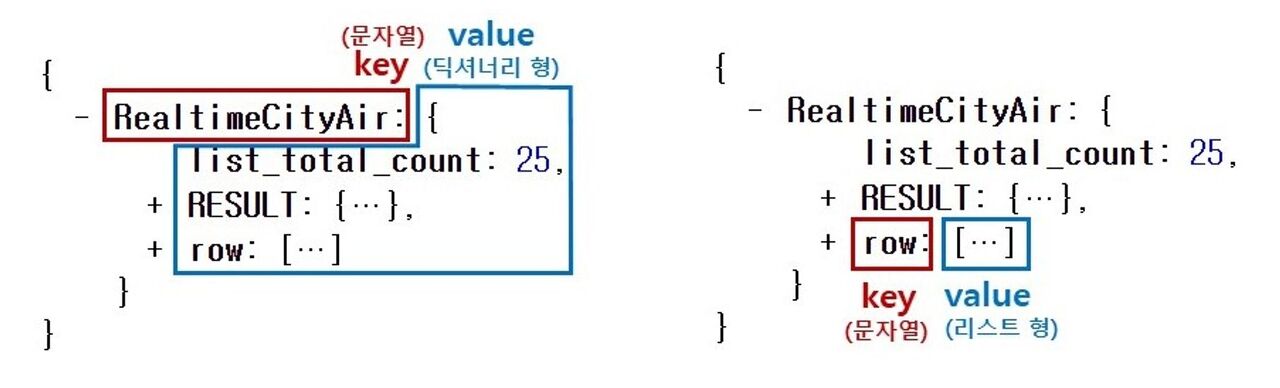
- JSON은, Key:Value로 이루어져 있습니다. 자료형 Dictionary와 아주- 유사하죠
- 위 예제에서는 RealtimeCityAir라는 키 값에 딕셔너리 형 value가 들어가 있고, 그 안에 row라는 키 값에는 리스트형 value가 들어가 있습니다.
✅ API는 은행 창구와 같은 것!
- 같은 예금 창구에서도 개인 고객이냐 기업 고객이냐에 따라 가져와야 하는 것 / 처리해주는 것이 다른 것처럼, 클라이언트가 요청할 때에도, "타입"이라는 것이 존재합니다.
- GET → 통상적으로! 데이터 조회(Read)를 요청할 때 예) 영화 목록 조회
- POST → 통상적으로! 데이터 생성(Create), 변경(Update), 삭제(Delete) 요청할 때 예) 회원가입, 회원 탈퇴, 비밀번호 수정
1) GET
- https://movie.daum.net/moviedb/main?movieId=161806
위 주소는 크게 두 부분으로 쪼개집니다. 바로 "?"가 쪼개지는 지점인데요.
"?" 기준으로 앞부분이 [서버 주소], 뒷부분이 [영화 번호] 입니다.
* 서버 주소: https://movie.daum.net/moviedb/main?
* 영화 정보: movieId=161806 - 여기서 잠깐, 그럼 code 형식으로 영화번호를 주는 것은 누가 정하는 것일까요? → 네, 바로 프론트엔드 개발자와 백엔드 개발자가 미리 정해둔 약속입니다. 프론트엔드: "code 형식으로 영화번호를 주면 될까요?" 백엔드: "네 그렇게 하시죠. 그럼 code로 영화번호가 들어온다고 생각하고 코딩하고 있을게요"
09. Fetch로 요청 보내기
- fetch.html 파일을 만들고 아래 코드를 넣어 연습해보자.
-
<!DOCTYPE html><html lang="en"><head><meta charset="UTF-8"><meta name="viewport" content="width=device-width, initial-scale=1.0"><title>Fetch 시작하기</title></head><body><h1>Fetch 연습을 위한 페이지</h1><script></script></body></html>
- <script>안에 Fetch 기본 골격 코드를 넣는다.
- fetch("여기에 URL을 입력") // 이 URL로 웹 통신을 요청한다. 괄호 안에 다른 것이 없다면 GET!
.then(res => res.json()) // 통신 요청을 받은 데이터는 res라는 이름으로 JSON화 한다
.then(data => {
console.log(data) // 개발자 도구에 찍어보기
}) // JSON 형태로 바뀐 데이터를 data라는 이름으로 붙여 사용한다


- http://spartacodingclub.shop/sparta_api/seoulair의 주소로 들어가서 코드를 살펴보면 그동안 배웠던 리스트, 딕셔너리의 코드들로 되어있는 것을 볼 수 있다.
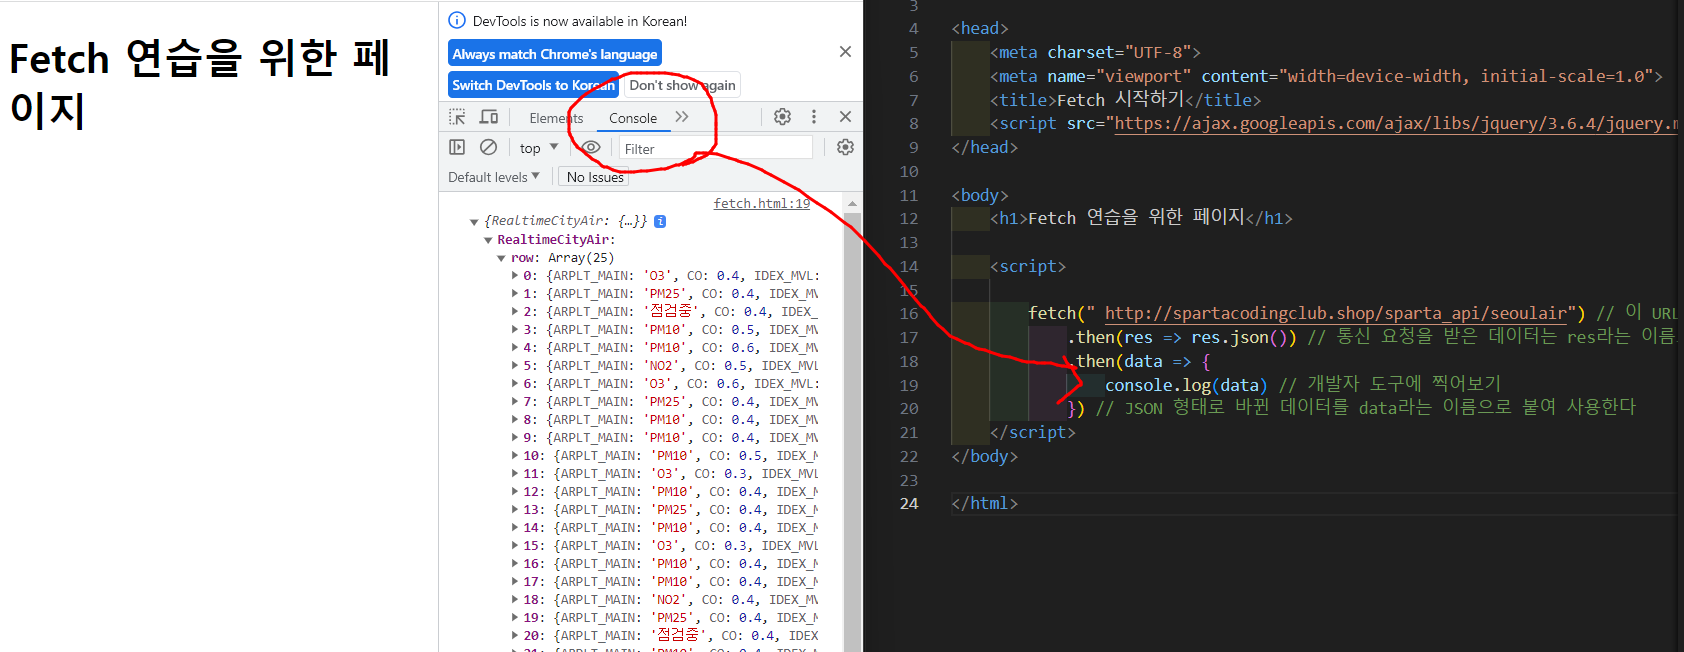
- 요청하여 가져온 브라우저의 코드를 console 을 통해 볼 수 있다.
10. Fetch 데이터 처리하기
✅ 미세먼지 데이터가 어디있는지 먼저 찾아보자.

- console.leg(data[]) 에 ['RealtimeCityAir']['row'][0]); 를 추가하면 RealtimeCityAir 의 딕셔너리에서 row 의 딕셔너리의 0번째 리스트를 가져와 console 에 출력해서 보여준다.

✅ 반복문으로 구 데이터를 출력해보자.

- let rows = data[ 'RealtimeCityAir']['row'] 로 먼저 rows 의 데이터를 뽑아주고
- rows 를 반복하여 나열하기 위해 함수를 이용한다.
- console.log(element['MSRSTE_NM']) 로 "중구" 지역을 뽑은 후, 아래에 [단축키: Alt +Shift + 화살표 아래키]를 눌러 복사 붙여넣기 하면 console.log(element[' IDEX_MVL ']) 로 52의 미세먼지 농도를 출력할 수 있다.
<!DOCTYPE html>
<html lang="en">
<head>
<meta charset="UTF-8">
<meta name="viewport" content="width=device-width, initial-scale=1.0">
<title>Fetch 시작하기</title>
</head>
<body>
<h1>Fetch 연습을 위한 페이지</h1>
<script>
fetch(" http://spartacodingclub.shop/sparta_api/seoulair") // 이 URL로 웹 통신을 요청한다. 괄호 안에 다른 것이 없다면 GET!
.then(res => res.json()) // 통신 요청을 받은 데이터는 res라는 이름으로 JSON화 한다
.then(data => {
let rows = data['RealtimeCityAir']['row']
rows.forEach(element => {
console.log(element['MSRSTE_NM'])
console.log(element['IDEX_MVL'])
});
// 개발자 도구에 찍어보기
}) // JSON 형태로 바뀐 데이터를 data라는 이름으로 붙여 사용한다
</script>
</body>
</html>
11. Fetch 연습하기
✅ 서울시 OpenAPI(실시간 미세먼지 상태)를 이용하기
- Fetch2.html 을 만들고 시작한다.
-
<!DOCTYPE html><html lang="en"><head><meta charset="UTF-8"><meta name="viewport" content="width=device-width, initial-scale=1.0"><title>미세먼지 API로Fetch 연습하고 가기!</title><style type="text/css">div.question-box {margin: 10px 0 20px 0;}</style></head><body><h1>Fetch 연습하자!</h1><hr /><div class="question-box"><h2>1. 서울시 OpenAPI(실시간 미세먼지 상태)를 이용하기</h2><p>모든 구의 미세먼지를 표기해주세요</p><p>업데이트 버튼을 누를 때마다 지웠다 새로 씌여져야 합니다.</p><button onclick="q1()">업데이트</button><ul id="names-q1"><li>중구 : 82</li><li>종로구 : 87</li><li>용산구 : 84</li><li>은평구 : 82</li></ul></div><script>function q1() {// 여기에 코드를 입력하세요}</script></body>
</html>
- onclick 을 하면 q1 이 출력되는 것을 만들어보자.
- script 안에 function 함수에 fetch 를 화면에 추가하면 된다.
<script>
function q1() {
.then(res => res.json())
.then(data => {
console.log(data)
})
}
</script>
- fetch 안에 미세먼지 OpenAPI 의 주소 http://spartacodingclub.shop/sparta_api/seoulair 를 붙여넣어준다.
- 창을 만들어보면 console 창에 아무것도 뜨지 않는다. 왜냐? onclick 을 했을 때 보여지도록 코드를 부여했기 때문에 클릭을 하면 console 창에 보인다.


- 위의 사진을 보면 row 까지만 출력하라고 해서 row 의 딕셔너리 까지만 출력된 것을 볼 수 있다.

- forEach 함수로 여러개를 돌려서 불러오자.
- 이때 가로가 잘 닫혔는지 어디에서 닫혀야하는지 주의하여 괄호를 신경쓰자.
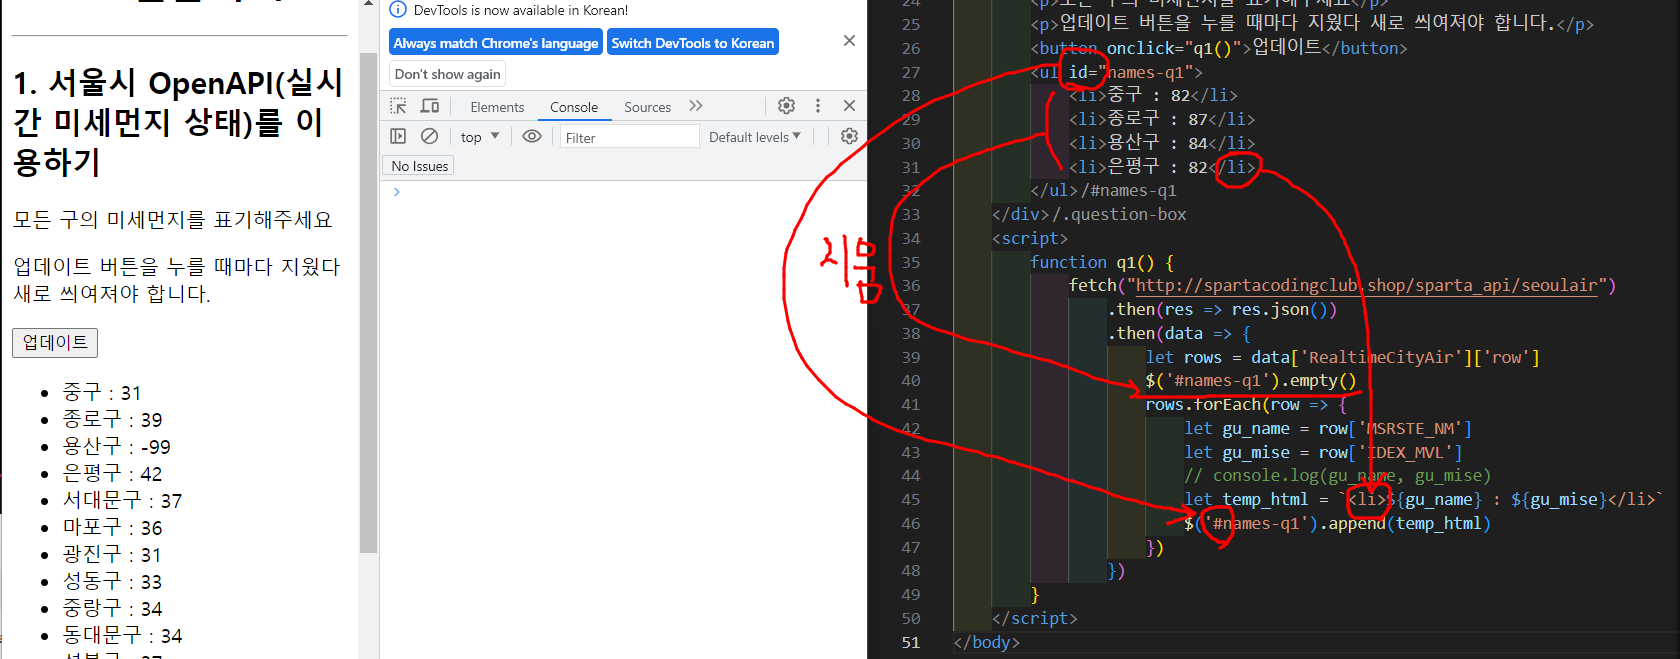
- let gu_name = row['MSRSTE_NM'] 와 let gu_mise = row['IDEX_MVL'] 를 부여해준다.
- let temp_html = `<li>${gu_name} : ${gu_mise}</li>` 로 중구 : 31 로 나올 수 있게 해준다. 여기서 <li> 로 하는 것은 위에 그렇게 부여가 되어있어서 그렇게 부여해준다.
- $('#names-q1').append(temp_html) 로 화면에 차례대로 temp_html 을 써줄 수 있도록 하고 어디에 써줄거냐면 다른 구역이 아닌 names-q1 에 부여해주는 것으로 표시가 된다. 여기서 id 를 #으로 표현해준것이다.
<!DOCTYPE html>
<html lang="en">
<head>
<meta charset="UTF-8">
<meta name="viewport" content="width=device-width, initial-scale=1.0">
<title>미세먼지 API로Fetch 연습하고 가기!</title>
<style type="text/css">
div.question-box {
margin: 10px 0 20px 0;
}
</style>
</head>
<body>
<h1>Fetch 연습하자!</h1>
<hr />
<div class="question-box">
<h2>1. 서울시 OpenAPI(실시간 미세먼지 상태)를 이용하기</h2>
<p>모든 구의 미세먼지를 표기해주세요</p>
<p>업데이트 버튼을 누를 때마다 지웠다 새로 씌여져야 합니다.</p>
<button onclick="q1()">업데이트</button>
<ul id="names-q1">
<li>중구 : 82</li>
<li>종로구 : 87</li>
<li>용산구 : 84</li>
<li>은평구 : 82</li>
</ul>
</div>
<script>
function q1() {
.then(res => res.json())
.then(data => {
let rows = data['RealtimeCityAir']['row']
$('#names-q1').empty()
rows.forEach(row => {
let gu_name = row['MSRSTE_NM']
let gu_mise = row['IDEX_MVL']
// console.log(gu_name, gu_mise)
let temp_html = `<li>${gu_name} : ${gu_mise}</li>`
$('#names-q1').append(temp_html)
})
})
}
</script>
</body>
</html>
✅ 미세먼지가 40이상인 곳을 빨갛게 변형해보자.

- 위의 style 코드 안에 클래스 이름 .bad { color: red; } 를 넣어서 글자를 빨간색으로 만들어준다. 이때 적용되야할 곳에 클래스 이름도 같이 넣어주어야 한다.
- let temp_html = `<li class="bad">${gu_name} : ${gu_mise}</li>` 에 li 사이에 class="bad" 를 넣어주어야 적용된다.

- if else의 함수를 써서 gu_mise 가 >40 이면 빨간색으로 표시하고 아니면 검정색으로 표시하게 해준다.
- 이때 let temp_html = `<li class="bad">${gu_name} : ${gu_mise}</li>` 라고 써져있는 그대로로 실행하면 안된다. let을 따로 묶어주어야 함
- let temp_html = `` 로 맨 위에 빈통을 그려주고 if else 함수 안의 let 을 없애야 적용이 된다.
<!DOCTYPE html>
<html lang="en">
<head>
<meta charset="UTF-8">
<meta name="viewport" content="width=device-width, initial-scale=1.0">
<title>미세먼지 API로Fetch 연습하고 가기!</title>
<style type="text/css">
div.question-box {
margin: 10px 0 20px 0;
}
.bad {
color: red;
}
</style>
</head>
<body>
<h1>Fetch 연습하자!</h1>
<hr />
<div class="question-box">
<h2>1. 서울시 OpenAPI(실시간 미세먼지 상태)를 이용하기</h2>
<p>모든 구의 미세먼지를 표기해주세요</p>
<p>업데이트 버튼을 누를 때마다 지웠다 새로 씌여져야 합니다.</p>
<button onclick="q1()">업데이트</button>
<ul id="names-q1">
<li>중구 : 82</li>
<li>종로구 : 87</li>
<li>용산구 : 84</li>
<li>은평구 : 82</li>
</ul>
</div>
<script>
function q1() {
.then(res => res.json())
.then(data => {
let rows = data['RealtimeCityAir']['row']
$('#names-q1').empty()
rows.forEach(row => {
let gu_name = row['MSRSTE_NM']
let gu_mise = row['IDEX_MVL']
// console.log(gu_name, gu_mise)
let temp_html = ``
if (gu_mise > 40) {
temp_html = `<li class="bad">${gu_name} : ${gu_mise}</li>`
} else {
temp_html = `<li>${gu_name} : ${gu_mise}</li>`
}
$('#names-q1').append(temp_html)
})
})
}
</script>
</body>
</html>
12. 데일리모토 명언 기능 적용
- 기존에 만들어 놓은 motto_js.html 에 가서 적용해보자.
- let url = "https://api.quotable.io/random";
fetch(url).then(res => res.json()).then(data => {
console.log(data);
}) // 데일리모토 명언 fetch 골격을 script 태그 위에 넣는다. - 아래 사진처럼 "https://api.quotable.io/random" 을 주소창에 넣으면 코드가 나온다. 새로고침을 하면 명언과 인물이름이 바뀐다. /random 이라서
- 딕셔너리 키: 밸류로 내용이 정리되어 있는 것을 볼 수 있다.


- jQuery 를 사용할 거니까 head 안에 주소를 복사 붙여넣기 해야함. <script src="https://ajax.googleapis.com/ajax/libs/jquery/3.6.4/jquery.min.js"></script>

- 여기서 주의할 것 : 아래의 사진처럼 이름을 잘 가져와야 한다.

<!DOCTYPE html>
<html lang="en">
<head>
<meta charset="UTF-8" />
<meta http-equiv="X-UA-Compatible" content="IE=edge" />
<meta name="viewport" content="width=device-width, initial-scale=1.0" />
<title>Document</title>
<style>
body {
background-image: url("https://s3.ap-northeast-2.amazonaws.com/materials.spartacodingclub.kr/webjong/images/background.jpg");
background-position: center;
background-size: cover;
color: white;
}
.navbar {
display: flex;
justify-content: space-between;
align-items: center;
}
.weather {
display: flex;
align-items: center;
margin-right: 30px;
}
.container {
display: flex;
flex-direction: column;
/* Flex 안의 아이템들을 세로 방향으로 배치합니다. */
justify-content: center;
/* 주축 방향으로 가운데 정렬합니다. */
align-items: center;
/* 교차축 방향으로 가운데 정렬합니다. */
height: 100vh;
text-align: center;
}
.footer {
position: fixed;
left: 0;
bottom: 0;
width: 100%;
text-align: center;
font-weight: bold;
padding: 20px 0;
}
.greeting {
margin-bottom: 50px;
}
.motto {
margin-bottom: 100px;
}
.logo {
height: 32px;
margin-left: 30px;
}
</style>
</head>
<body>
<nav class="navbar">
<img class="logo"
src="https://s3.ap-northeast-2.amazonaws.com/materials.spartacodingclub.kr/webjong/images/sparta-logo.svg"
alt="" />
<div class="weather">
<p>날씨 맑음, 20ºC</p>
</div>
</nav>
<div class="container">
<div class="greeting">
<h1>Hello, My name!</h1>
<h1 id="current-time">12:30</h1>
</div>
<div class="motto">
<h3>My life's motto</h3>
<h2>웃으면 행복해집니다.</h2>
</div>
</div>
<div class="footer">
<p id="quoteAuthor">- 작자 미상 -</p>
<p id="quoteContent">멋진 명언입니다. 아이스크림을 먹으면 행복해져요.</p>
</div>
<script>
// 시간 chatgpt
function displayCurrentTime() {
var currentTime = new Date();
var hours = currentTime.getHours();
var minutes = currentTime.getMinutes();
var seconds = currentTime.getSeconds();
// Add leading zeros to minutes and seconds if they are less than 10
minutes = (minutes < 10 ? "0" : "") + minutes;
seconds = (seconds < 10 ? "0" : "") + seconds;
// Determine if it's AM or PM
var meridiem = hours >= 12 ? "PM" : "AM";
// Convert to 12-hour format
hours = hours % 12;
hours = hours ? hours : 12;
// Display the time in HH:MM:SS format
var timeString = hours + ":" + minutes + ":" + seconds + " " + meridiem;
// Display the time in an element with id "current-time"
document.getElementById("current-time").innerHTML = timeString;
}
// Call the displayCurrentTime function every second to update the time
setInterval(displayCurrentTime, 1000);
fetch(url).then(res => res.json()).then(data => {
// console.log(data);
let author = data["author"]
let content = data["content"];
let authorMsg = `- ${author} -`
let contentMsg = `" ${content} "`
$("#quoteAuthor").text(authorMsg);
$("#quoteContent").text(contentMsg);
})
</script>
</body>
</html>
반응형
'AI웹 개발자 과정 공부 (팀스파르타) > ChatGPT 웹 개발' 카테고리의 다른 글
| 24.02.19_TIL (파이썬 기초 : 함수, 조건문 등 및 가상환경) (0) | 2024.02.19 |
|---|---|
| 2강 숙제 (0) | 2024.02.18 |
| 24.02.16_TIL (자바스크립트 : 함수, 리스트, 딕셔너리) (0) | 2024.02.16 |
| 1강 숙제 (0) | 2024.02.15 |
| 24.02.15_TIL (멜로디쉐어 만들기) (0) | 2024.02.15 |