
티스토리 뷰
AI웹 개발자 과정 공부 (팀스파르타)/Django (장고)
24.04.19_TIL (2) (Django MTV CRUD - 1 )
티아(tia) 2024. 4. 19. 21:10728x90
++ 장고 공식 문서는 항상 확인하기
https://docs.djangoproject.com/en/4.2/
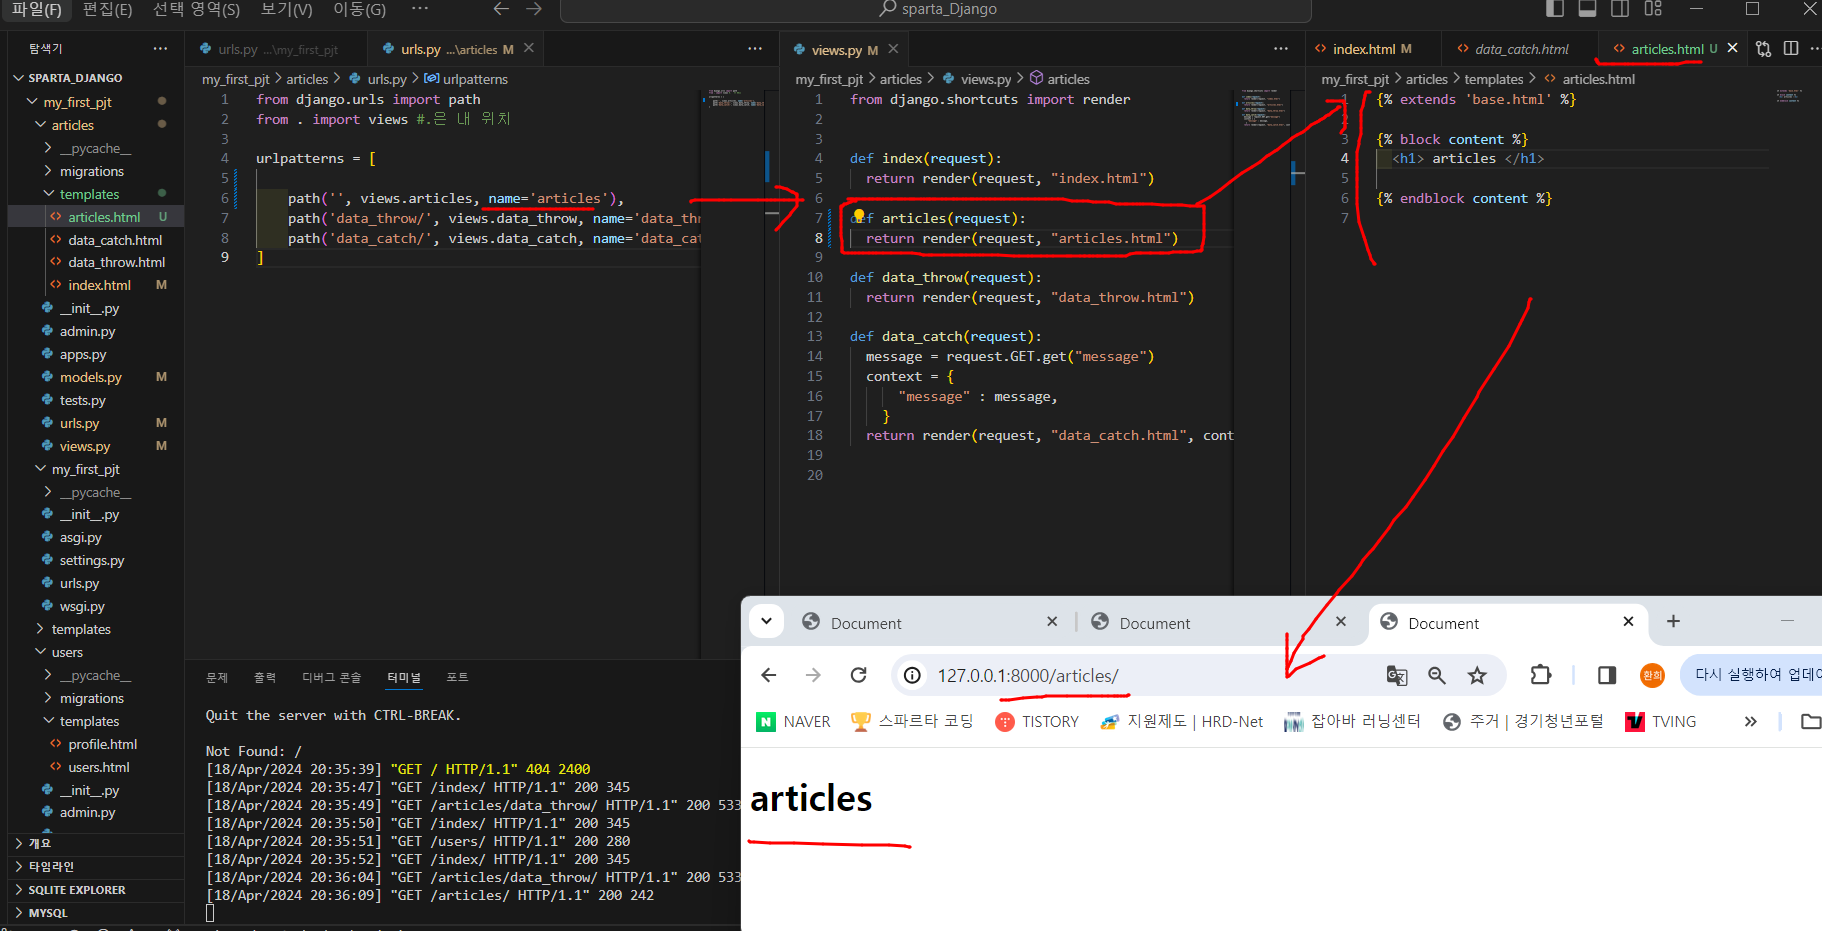
1. Articles 파일을 만들어 준다.
- my_first_pjt 에서 urls.py 에 articles를 연결해주기 위해서
- articles 의 urls.py 에서 hello 가 필요없어서 지워주고 articles 경로를 만들어 준다.
from django.urls import path
from . import views #.은 내 위치

urlpatterns = [

    path('', views.articles, name='articles'),
    path('data_throw/', views.data_throw, name='data_throw'),
    path('data_catch/', views.data_catch, name='data_catch'),
]
- articles 의 hello.html 도 필요 없으니 views.py 에서 hello 부분을 없애준다.

- view.py에 추가해준다.
def articles(request):
  return render(request, "articles.html")
- articles.html 추가해준다.
{% extends 'base.html' %}

{% block content %}
  <h1> articles </h1>

{% endblock content %}
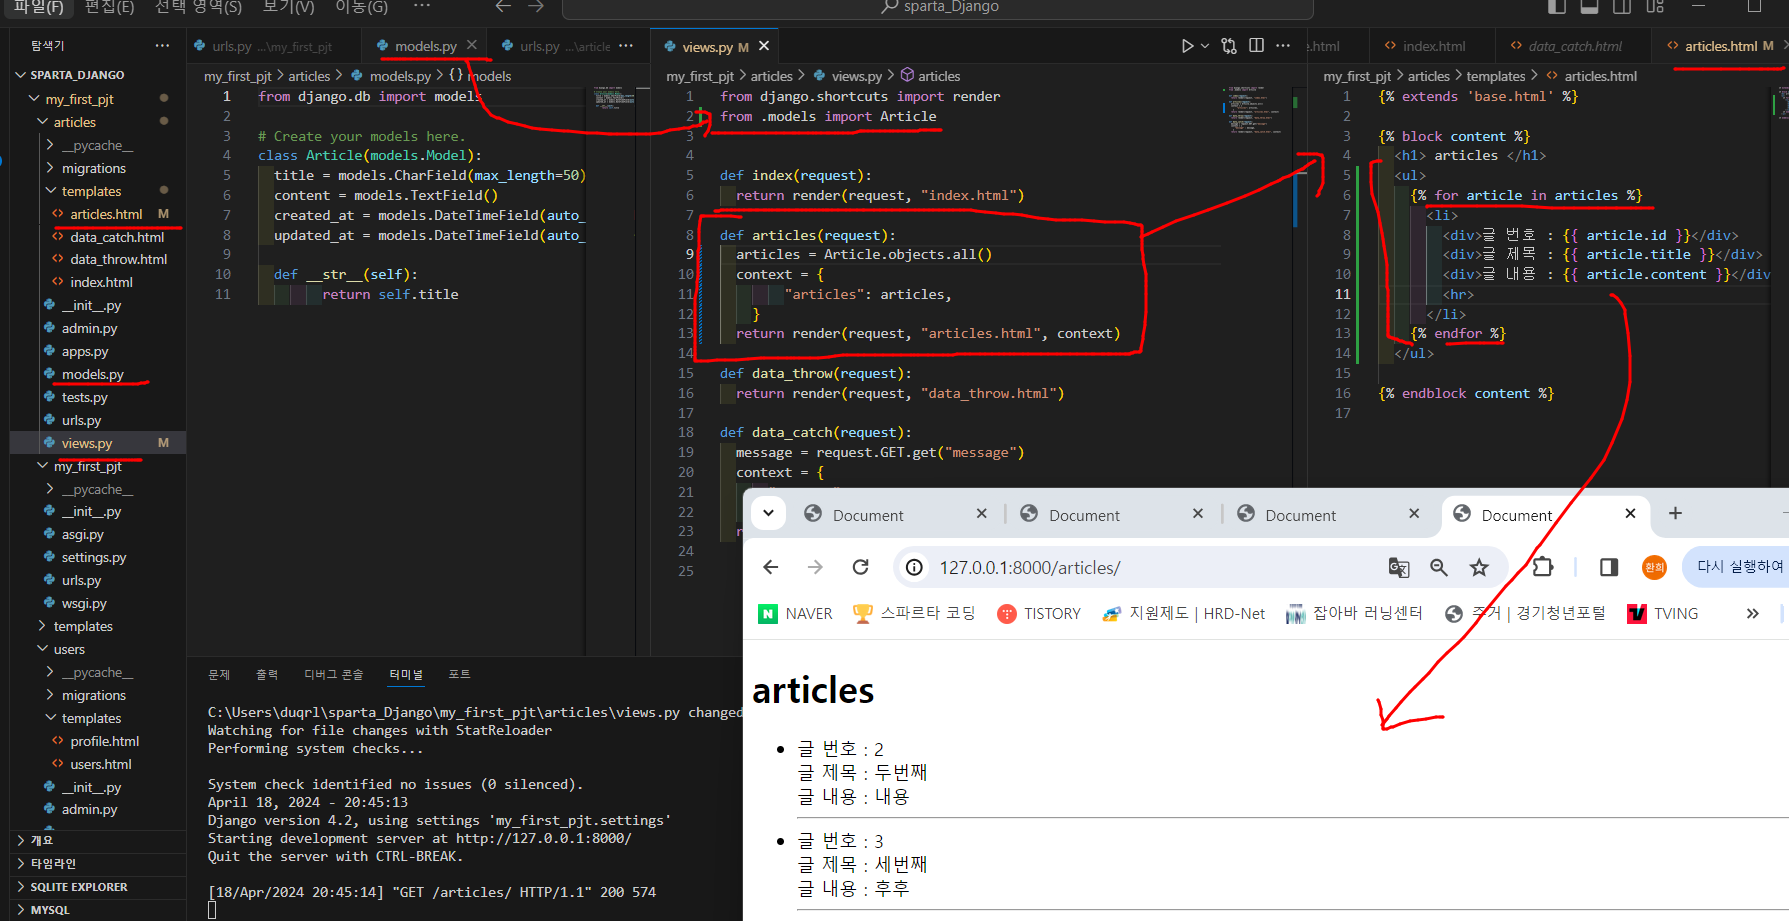
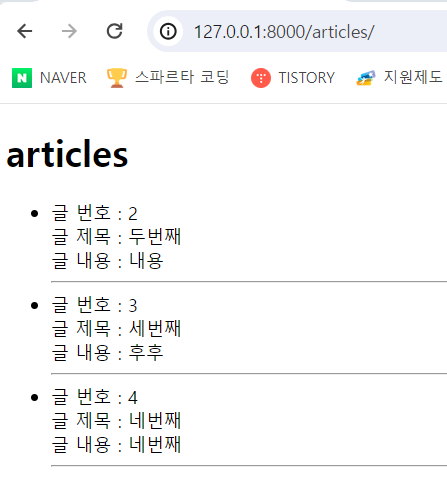
2. Articles 의 게시글들이 다 보이게 해주고 싶다.!
- view.py에서 수정하기
from .models import Article

def articles(request):
  articles = Article.objects.all()
  context = {
        "articles": articles,
    }
  return render(request, "articles.html", context)
- articles.html 에 코드 수정
- <hr> 은 줄을 하나 그어준다.
{% extends 'base.html' %}

{% block content %}
  <h1> articles </h1>
  <ul>
    {% for article in articles %}
      <li>
        <div>글 번호 : {{ article.id }}</div>
        <div>글 제목 : {{ article.title }}</div>
        <div>글 내용 : {{ article.content }}</div>
        <hr>
      </li>
    {% endfor %}
  </ul>

{% endblock content %}
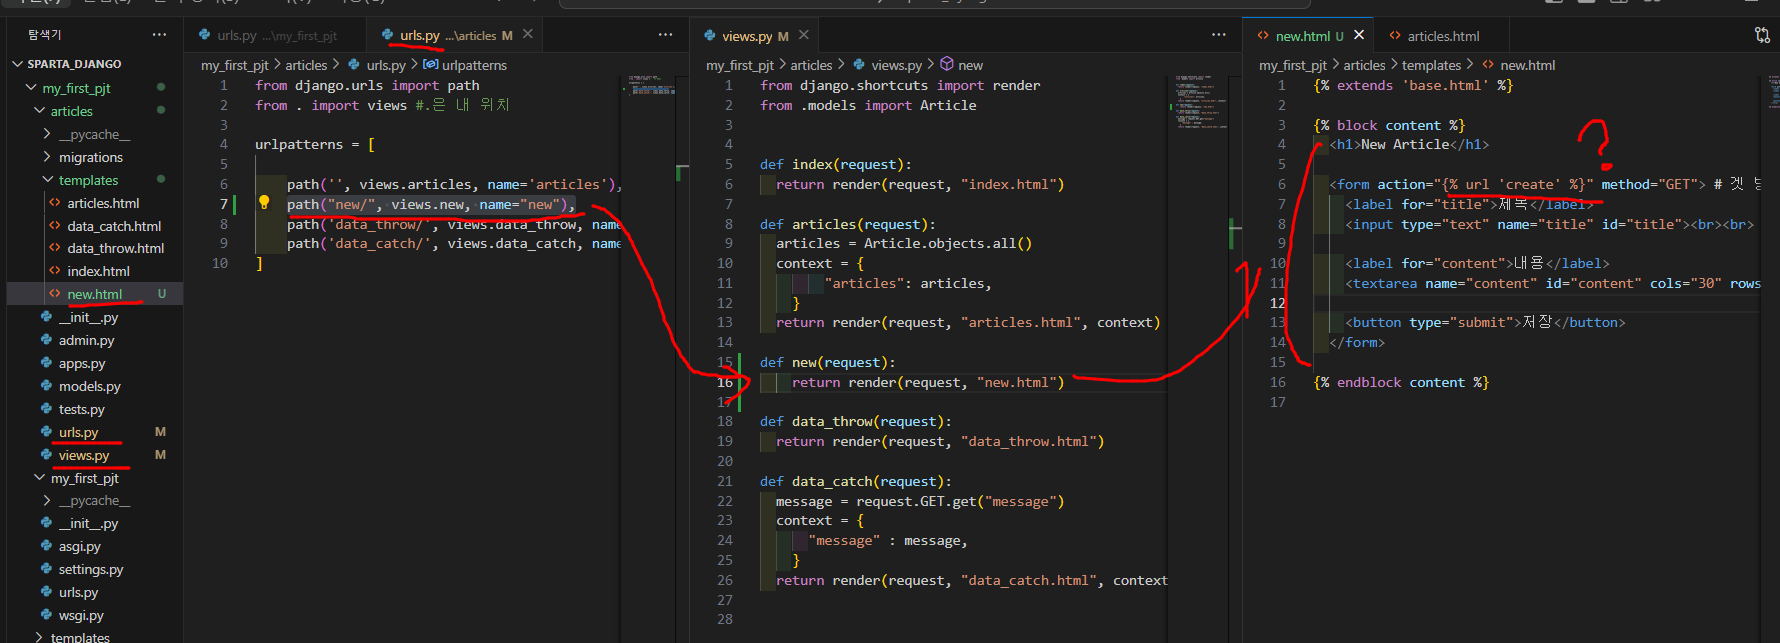
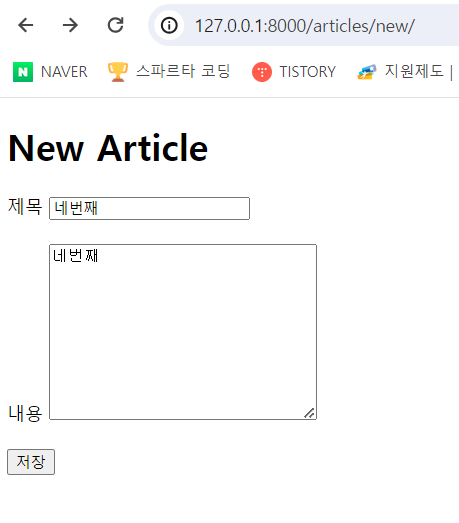
3. New 를 만들어 글을 작성해보자.
- articles 의 urls.py 에서 path 추가
path("new/", views.new, name="new"),
- view.py에서 new 추가
def new(request):
    return render(request, "new.html")
- new.html 에 코드 만들기
{% extends 'base.html' %}

{% block content %}
  <h1>New Article</h1>

  <form action="{% url 'create' %}" method="GET"> # 겟 방식의 데이터를 create 에 넘겨주겠다는 말
    <label for="title">제목</label>
    <input type="text" name="title" id="title"><br><br>

    <label for="content">내용</label>
    <textarea name="content" id="content" cols="30" rows="10"></textarea><br><br>

    <button type="submit">저장</button>
  </form>

{% endblock content %}
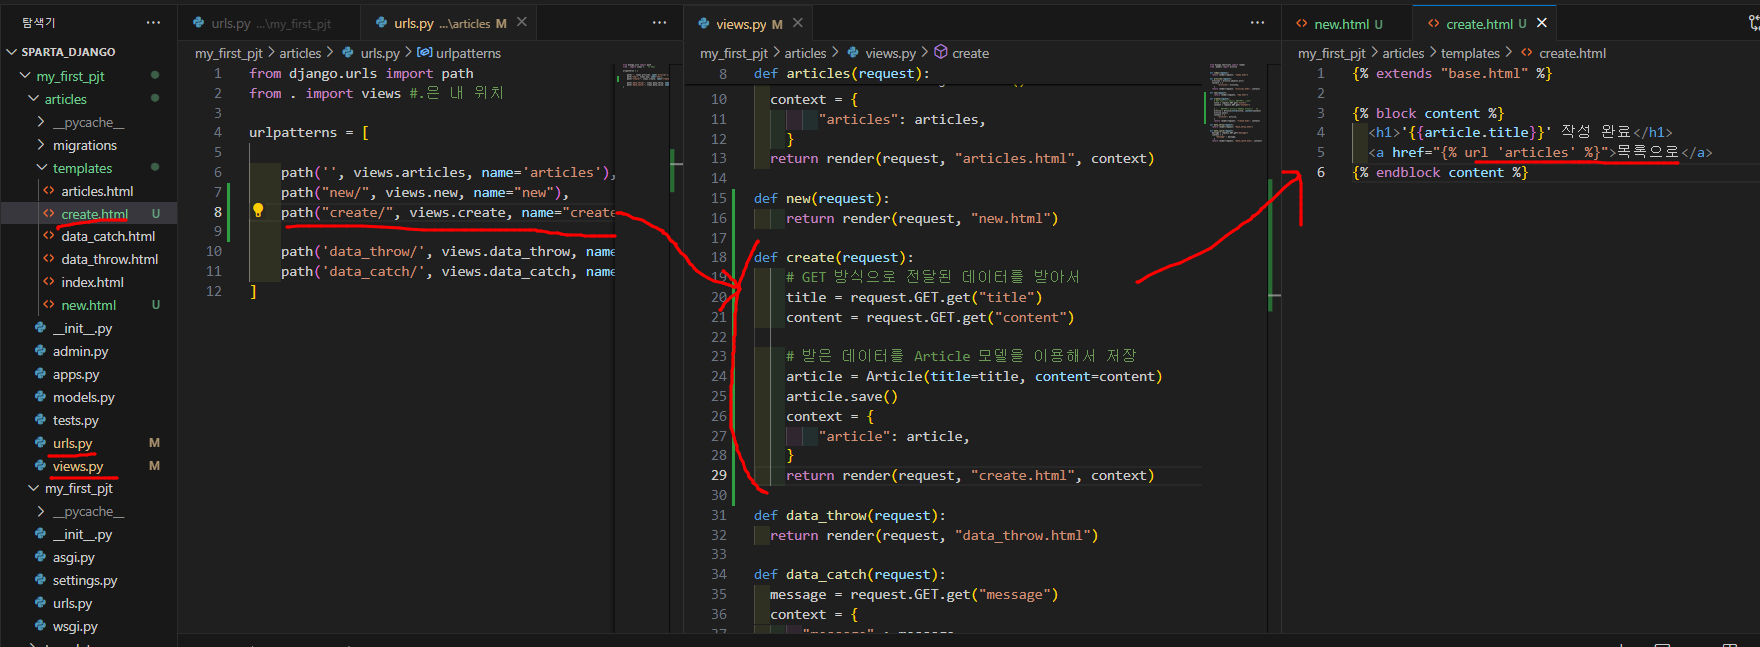
- 바로 create 도 만들어 보자.
- articles 의 urls.py 에서 path 추가
path("create/", views.create, name="create"),
- view.py에서 create 추가
def create(request):
    # GET 방식으로 전달된 데이터를 받아서
    title = request.GET.get("title")
    content = request.GET.get("content")

    # 받은 데이터를 Article 모델을 이용해서 저장
    article = Article(title=title, content=content)
    article.save()
    context = {
        "article": article,
    }
    return render(request, "create.html", context)
- create.html 에 코드 만들기
{% extends "base.html" %}

{% block content %}
	<h1>'{{article.title}}' 작성 완료</h1>
	<a href="{% url 'articles' %}">목록으로</a>
{% endblock content %}
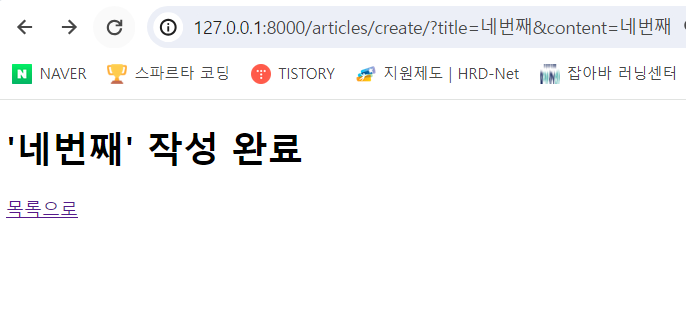
- 순서대로 잘 넘어가서 작성되는 것을 볼 수 있다.
🤔 만약 최신순으로 보여주고 싶다면 어떻게 하면 좋을까요?
created_at 을 사용하거나 pk를 사용하여 정렬을 해주면 됩니다!
(pk나 id 나 같은 값을 출력한다. order 로 정리할거야. by 어떤걸로? id 로..
내림차순으로 할거면 ‘-’를 붙여주면 됨

→ pk(primary key)는 기본키로 id와 동일해요!
- view.py에서 articles 에서 코드를 넣어준다. 여기서 created_at 은 models.py 의 키를 가져옴. 생성순서를 주기 위해서.
- 키값을 pk로 주어도 생성 번호로 정렬하기 때문에 결과값이 똑같다.
def articles(request):
  articles = Article.objects.all().order_by("-created_at")
  context = {
        "articles": articles,
    }
  return render(request, "articles.html", context)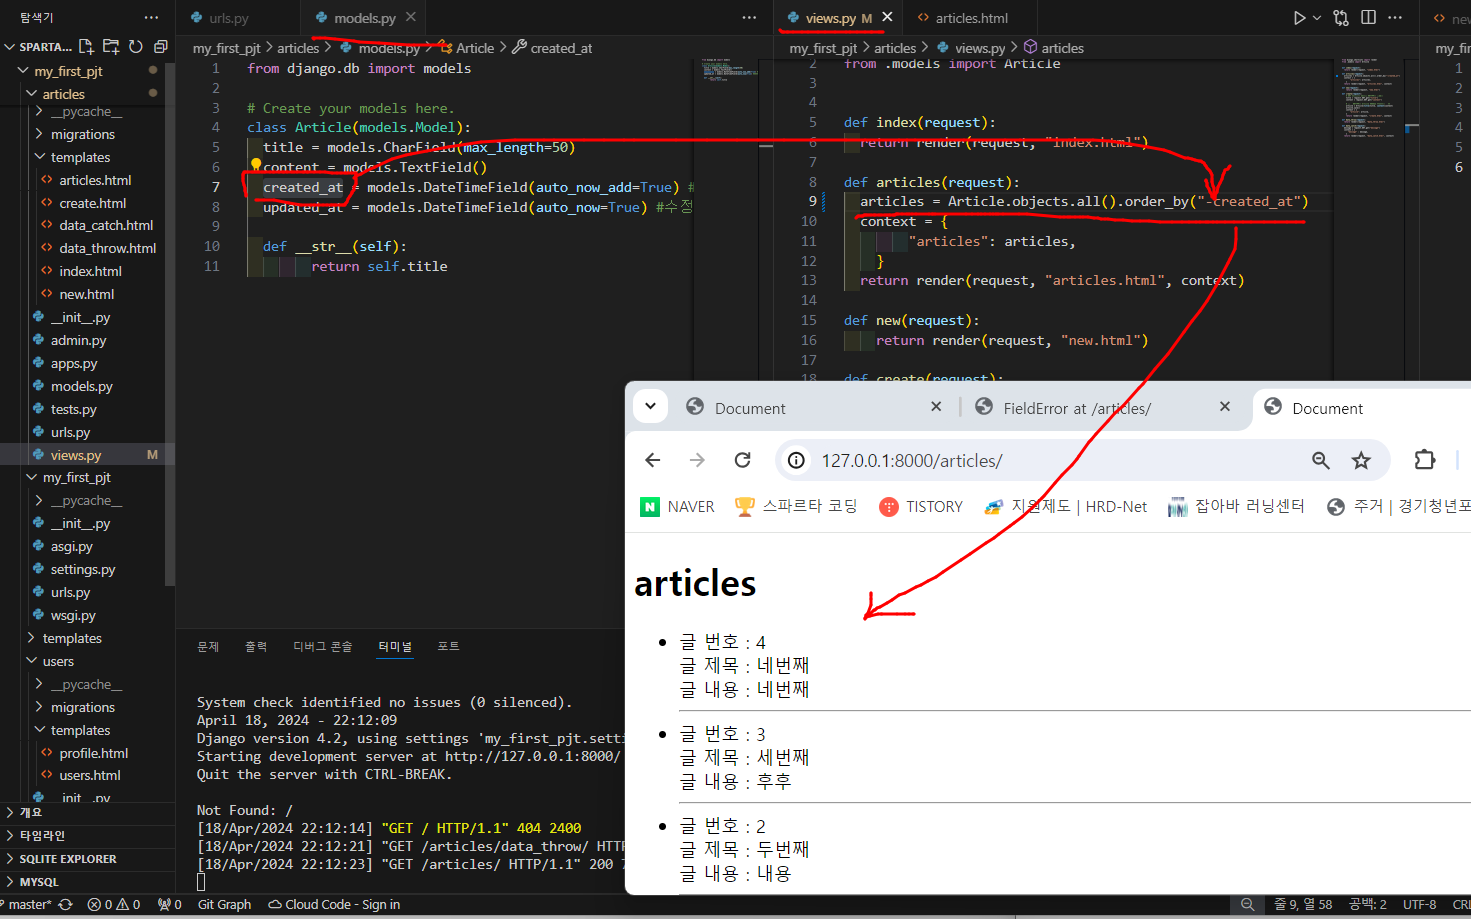
4. POST 방식을 알아보자.
GET & POST
GET
- 말그래도 원하는 리소스를 가져오는데에 사용합니다.
- 생성할 때도 사용할 수 있지만(로직상 문제는 없지만), 리소스 조회용으로 사용하자는 개발세계에서의 약속입니다.
- DB에 변화를 주지 않는 요청임을 의미합니다.
- Read에 해당합니다. - 읽는 것만 가능한 것으로 하자. 하고 약속함 수정 삭제가 안된다는거쥬
POST
- 서버로 데이터를 전송할 때 사용합니다.
- 특정 리소스를 생성 혹은 수정하기 위해 사용합니다.
- DB에 변화를 주는 요청임을 의미합니다.
- Create, Update, Delete에 해당합니다.
- 그냥 get을 post로 바꾸어버리면 서버가 터져버린다!
- 사이트간 요청 위조 CSRF(Cross-Site-Request-Forgery)
- 유저가 실수로 해커가 작성한 로직을 따라 특정 웹페이지에 수정/삭제등의 요청을 보내게 되는 것입니다. - 크로스라고 해서 내가 원한 사이트에서 하는게 아니라 다른 사이트에서 가져온다거나 결과를 다른 사이트에 주는 것이지요-유저가 한일이지만 헤커가 원하는 경로로 가게 만드는 것이에요
- CSRF Token을 사용해서 막을 수 있습니다. - 비밀번호 같은 이치
- 유저가 서버에 요청을 보낼 때 함께 제공되는 특별한 토큰 값으로, 이 토큰은 사용자의 세션과 연결되어 있습니다. 요청이 전송될 때, 함께 제출되며 서버는 요청을 받을 때 이 토큰을 검증하여 요청이 유효한지 확인하는 방식으로 CSRF을 방지합니다.
- 쉽게말해 서로 알아볼 수 있는 임의의 비밀번호를 만들어서 주고 받는다고 생각해주세요!
- 일반적으로 GET을 제외한 데이터를 변경하는 Method에 적용합니다.
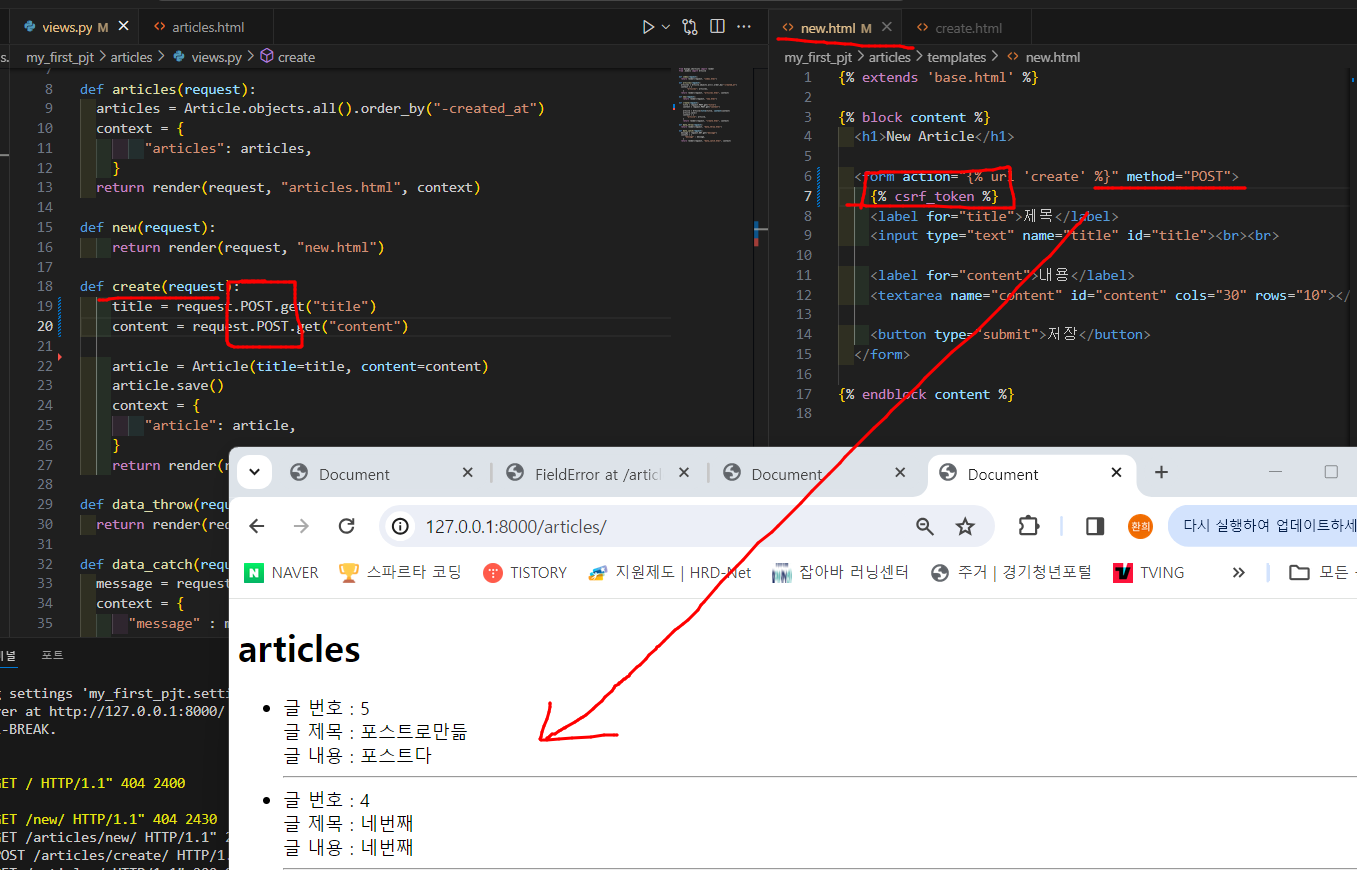
- views.py 에서 create 를 POST로 바꾸어줌
def create(request):
    title = request.POST.get("title")
    content = request.POST.get("content")

    article = Article(title=title, content=content)
    article.save()
    context = {
        "article": article,
    }
return render(request, "create.html", context)- new.html 에 코드도 바꾸어준다.
{% extends 'base.html' %}

{% block content %}
  <h1>New Article</h1>

  <form action="{% url 'create' %}" method="POST">
    {% csrf_token %}
    <label for="title">제목</label>
    <input type="text" name="title" id="title"><br><br>

    <label for="content">내용</label>
    <textarea name="content" id="content" cols="30" rows="10"></textarea><br><br>

    <button type="submit">저장</button>
  </form>

{% endblock content %}
반응형
'AI웹 개발자 과정 공부 (팀스파르타) > Django (장고)' 카테고리의 다른 글
| 24.04.22_TIL (1) (Django Form & Model Form & URL Namespace ) (0) | 2024.04.22 |
|---|---|
| 24.04.19_TIL (3) (Django MTV CRUD - 2 ) (0) | 2024.04.19 |
| 24.04.19_TIL (1) (Django Model & ORM & CRUD) (1) | 2024.04.19 |
| 24.04.18_TIL (3) (Django 다중 앱과 URL) (1) | 2024.04.18 |
| 24.04.18_TIL (2) (Django HTTP form) (0) | 2024.04.18 |