
티스토리 뷰
24.06.04_TIL ( 팀 프로젝트 : AI NOST Django ) _ 9. My book list 랑 bookdetail 연결, 댓글 CRUD 연결
티아(tia) 2024. 6. 4. 11:03
[ 세번째 프로젝트 ]
AI를 이용한 소설 사이트를 만들어 보자.
++ 팀 스로젝트로 팀과의 협업이 중요하다.
++ 장고 공식 문서는 항상 확인하기
https://docs.djangoproject.com/en/4.2/
++ 랭체인 공식 문서
https://www.langchain.com/
++ 리액트 공식문서
https://ko.legacy.reactjs.org/  # 한국어
https://ko.react.dev/
https://github.com/1489ehdghks/NOST.git
GitHub - 1489ehdghks/NOST
Contribute to 1489ehdghks/NOST development by creating an account on GitHub.
github.com
1. 게시글에서 제목을 클릭하면 상세페이지로 넘어가기
++ 이거 전에 만들어 놓은 carddetail 을 수정해서 같이 타넘어 오도록 해야함
++ carddetail 을 bookdetail 로 바꾸는 작업을 한다.
- 책 목록을 가져오려면: http://127.0.0.1:8000/api/books/
- 특정 책의 세부 정보를 가져오려면: http://127.0.0.1:8000/api/books/{book_id}/
- 책에 대한 댓글 목록을 가져오려면: http://127.0.0.1:8000/api/books/{book_id}/comments/
- 특정 책의 특정 댓글을 가져오려면: http://127.0.0.1:8000/api/books/{book_id}/comments/{comment_id}/
- 책에 대한 좋아요를 추가하려면: http://127.0.0.1:8000/api/books/{book_id}/like/
- 책에 대한 평가를 추가하려면: http://127.0.0.1:8000/api/books/{book_id}/rating/
이렇게 프론트엔드에서 백엔드의 URL을 수정해야한다.
src/ pages/ main/ component/ BookList.jsx 에 네이게이트를 추가해준다.
import { useNavigate } from 'react-router-dom';

...

    const navigate = useNavigate(); // 페이지 이동을 위한 네비게이트 함수
    const handleBookClick = (id) => {
        navigate(`/book/${id}`);
    };

    ...


     return (

     ...

     <tbody>
        {currentBooks.map((book) => (
            <tr key={book.id} onClick={() => handleBookClick(book.id)}>
                <td>{book.title}</td>
                <td>{book.user_id}</td>
                <td>{book.is_liked.length}</td>  {/* 배열의 길이로 좋아요 수 출력 */}
                <td>{book.average_rating}</td>
                <td>{new Date(book.created_at).toLocaleDateString()}</td>
            </tr>
        ))}
    </tbody>

...

...
src/ app/ Approuter.jsx 도 수정해준다.
카드 부분을 book으로 바꾸어서 보여준다. 모든 북 상세는 북디테일에서 보여줄 수 있게
import React from 'react';
import { Routes, Route, Navigate } from 'react-router-dom';
import HomePage from '../pages/home/HomePage';
import MainPage from '../pages/main/MainPage';
import useAuthStore from '../shared/store/AuthStore';
import Profile from '../pages/profile/Profile';
import Mybooklist from '../pages/mybooks/Mybooklist';
import BookDetail from '../widgets/book/BookDetail';
import SideLayout from '../widgets/layout/sideLayout/SideLayout';

const AppRouter = () => {
    const { isLoggedIn } = useAuthStore();

    return (
        <Routes>
            <Route path="/" element={isLoggedIn ? <MainPage /> : <HomePage />} />
            <Route path="/main" element={<MainPage />} />
            <Route path="/profile" element={<SideLayout><Profile /></SideLayout>} />
            <Route path="/Mybooklist" element={<SideLayout><Mybooklist /></SideLayout>} />
            <Route path="/book/:id" element={<SideLayout><BookDetail /></SideLayout>} />
            <Route path="*" element={<Navigate to="/" />} />
        </Routes>
    );
};

export default AppRouter;
src/ widgets/ book/ BookDetail.jsx 를 수정해준다.
import React, { useState, useEffect } from 'react';
import axios from 'axios';
import { useParams } from 'react-router-dom';
import useThemeStore from '../../shared/store/Themestore';
import './BookDetail.scss';

const BookDetail = () => {
  const { id } = useParams();
  const { themes, currentSeason } = useThemeStore();
  const currentTheme = themes[currentSeason];
  const [bookData, setBookData] = useState(null);
  const [comments, setComments] = useState([]);

  useEffect(() => {
    axios.get(`http://127.0.0.1:8000/api/books/${id}/`)
      .then(response => {
        setBookData(response.data);
        setComments(response.data.comments || []); // 댓글이 없을 경우 빈 배열로 초기화
      })
      .catch(error => {
        console.error('Error fetching book data:', error);
      });
  }, [id]);

  return (
    <div className="book-detail" style={{ color: currentTheme.textColor }}>
      {bookData && (
        <div className="summary">
          <h1>{bookData.title}</h1>
          {/* <img src={bookData.image} alt={bookData.header} /> */}
          {/* <p>{bookData.content}</p> */}
          <p>{bookData.user_id}</p>
          <p>{bookData.is_liked.length}</p>  {/* 배열의 길이로 좋아요 수 출력 */}
          <p>{bookData.average_rating}</p>
        </div>
      )}
      <div className="comment-box">
        <h2>Comment Box</h2>
        <div className="comments">
          {comments.map((comment, index) => (
            <div className="comment" key={index}>
              <img src="https://via.placeholder.com/50" alt="User" />
              <p>{comment.text} <br />{comment.user} <small>on {comment.date}</small></p>
            </div>
          ))}
        </div>
        <textarea placeholder="Your comments"></textarea>
        <button style={{ backgroundColor: currentTheme.buttonBackgroundColor, color: currentTheme.buttonTextColor }}>Add</button>
      </div>
    </div>
  );
};

export default BookDetail;
.book-detail {
  display: flex;
  justify-content: space-between;
  padding: 20px;
  margin-top: 50px;
  height: 100%; // 화면 전체 높이 설정
  overflow: auto; //스크롤 활성화
  scrollbar-width: none; /* 스크롤바 안보임 */
}

.summary {
  flex: 1.5;
  margin-right: 20px;
  padding: 20px;
  background-color: #ffcccc; // example color
  border-radius: 10px;
  margin-bottom: 50px;

  h1 {
    margin-bottom: 10px;
  }

  p {
    font-size: 16px;
    line-height: 1.5;
  }
}

.comment-box {
  flex: 1;
  margin-left: 50px;
  margin-bottom: 50px;

  h2 {
    margin-bottom: 10px;
  }
}

.comments {
  margin-bottom: 20px;
}

.comment {
  display: flex;
  align-items: flex-start;
  margin-bottom: 10px;

  img {
    width: 50px;
    height: 50px;
    border-radius: 50%;
    margin-right: 10px;
  }

  .p {
    font-size: 14px;
    line-height: 1.4;
  }
}

.book-detail textarea {
  width: 95%;
  height: auto;
  padding: 10px;
  margin-bottom: 10px;
  border-radius: 5px;
  border: 1px solid #ccc;
  resize: none; /* 사용자가 크기를 조절하지 못하도록 설정합니다. */
  scrollbar-width: none; /* 스크롤바 안보임 */
}

.book-detail button {
  padding: 10px 20px;
  color: #fff;
  border: none;
  border-radius: 5px;
  cursor: pointer;
  margin-bottom: 150px;
  // margin-left: auto;
  // display: flex;

  &:hover {
    background-color: #eceaea !important;
  }
}
일단 북 데이터는 잘 넘어오지만 댓글은 넘어오지 않는다.

2. 댓글 연결하기

포스트맨에서 book_1 의 데이터를 가져오면 따로 comment 부분은 노출을 시켜주지 않는 것을 볼 수 있다.
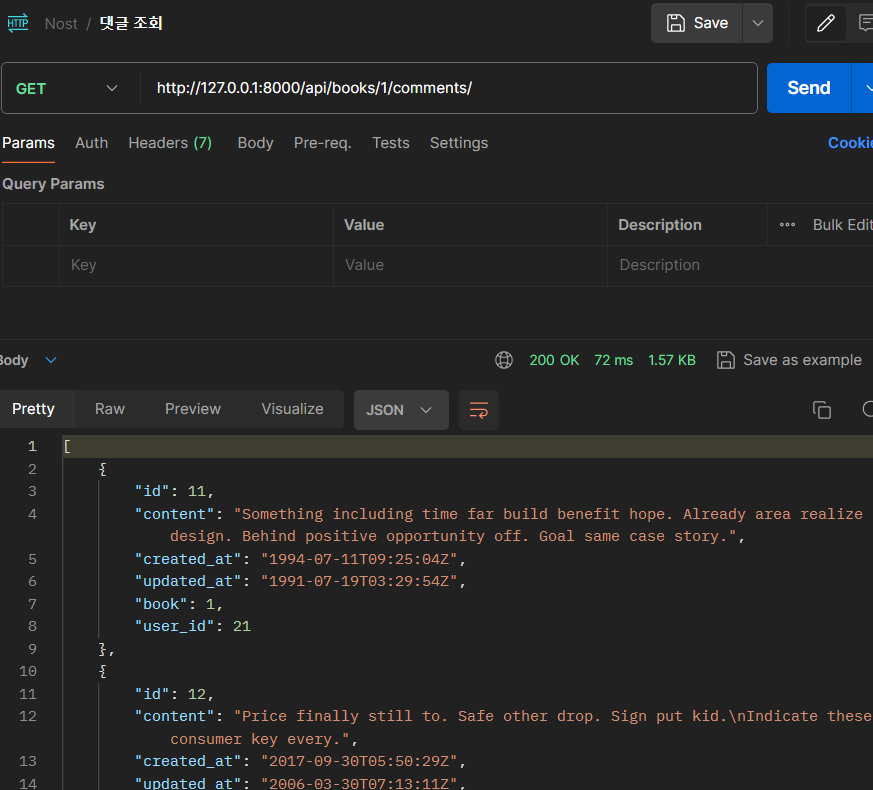
이렇게 따로 주소로 가져와 주어야 한다.
import React, { useState, useEffect } from 'react';
import axios from 'axios';
import { useParams } from 'react-router-dom';
import useThemeStore from '../../shared/store/Themestore';
import './BookDetail.scss';

const BookDetail = () => {
  const { id } = useParams();
  const { themes, currentSeason } = useThemeStore();
  const currentTheme = themes[currentSeason];
  const [bookData, setBookData] = useState(null);
  const [comments, setComments] = useState([]);

  useEffect(() => {
    // 책 데이터를 가져오는 API 요청
    axios.get(`http://127.0.0.1:8000/api/books/${id}/`)
      .then(response => {
        setBookData(response.data);
      })
      .catch(error => {
        console.error('Error fetching book data:', error);
      });

    // 댓글 데이터를 가져오는 API 요청
    axios.get(`http://127.0.0.1:8000/api/books/${id}/comments/`)
      .then(response => {
        setComments(response.data || []); // 댓글이 없을 경우 빈 배열로 초기화
        console.error('comments:', response.data);
      })
      .catch(error => {
        console.error('Error fetching comments:', error);
      });
  }, [id]);

  return (
    <div className="book-detail" style={{ color: currentTheme.textColor }}>
      {bookData && (
        <div className="summary" style={{ backgroundColor: currentTheme.buttonBackgroundColor }}>
          <h1>{bookData.title}</h1>
          {/* <img src={bookData.image} alt={bookData.header} /> */}
          {/* <p>{bookData.content}</p> */}
          <p>{bookData.user_id}</p>
          <p>{bookData.is_liked.length}</p>  {/* 배열의 길이로 좋아요 수 출력 */}
          <p>{bookData.average_rating}</p>
        </div>
      )}
      <div className="comment-box">
        <h2>Comment Box</h2>
        <div className="comments">
          {comments.map((comment, index) => (
            <div className="comment" key={index}>
              <img src="https://via.placeholder.com/50" alt="User" />
              <p>{comment.content} <br />{comment.id} <small>on {comment.created_at}</small></p>
            </div>
          ))}
        </div>
        <textarea placeholder="Your comments"></textarea>
        <button style={{ backgroundColor: currentTheme.buttonBackgroundColor, color: currentTheme.buttonTextColor }}>Add</button>
      </div>
    </div>
  );
};

export default BookDetail;

이렇게 기존 데이터를 가져와서 보여줄 수 있다.
3. 댓글 작성하기
회원정보를 가져와서 댓글을 작성해야하기 때문에 features/auth/AuthInstance 여기에서 정보를 가져와서 입력하게끔 해줘야함 (토큰 정보)
import axiosInstance from '../../features/auth/AuthInstance'

...

const BookDetail = () => {
  const { id } = useParams();
  const { themes, currentSeason } = useThemeStore();
  const currentTheme = themes[currentSeason];
  const [bookData, setBookData] = useState(null);
  const [comments, setComments] = useState([]);

 ...

  // 새로운 댓글 입력

  const [newComment, setNewComment] = useState('');

  const handleAddComment = async () => {
    try {
      const response = await axiosInstance.post(`http://127.0.0.1:8000/api/books/${id}/comments/`, {
        content: newComment,
      });

      setComments([...comments, response.data]);
      setNewComment('');
    } catch (error) {
      console.error('Error adding comment:', error);
      alert('댓글을 추가하는 중에 오류가 발생했습니다.');
    }
  };


  return (
    <div className="book-detail" style={{ color: currentTheme.textColor }}>

     ...

      <div className="comment-box">
        <h2>Comment Box</h2>
        <div className="comments">
          {comments.map((comment, index) => (
            <div className="comment" key={index}>
              <img src="https://via.placeholder.com/50" alt="User" />
              <p>{comment.content} <br />{comment.user_id} <small>on {comment.created_at}</small></p>
              <button onClick={() => handleEditComment(comment)}>Edit</button>
              <button onClick={() => handleDeleteComment(comment.id)}>Delete</button>
            </div>
          ))}
     ...

    </div>
  );
};

export default BookDetail;
생성될 때 디비에 저장되는 것을 볼 수 있다.

4. 댓글 수정하기, 삭제하기
import React, { useState, useEffect } from 'react';
import axios from 'axios';
import { useParams } from 'react-router-dom';
import useThemeStore from '../../shared/store/Themestore';
import axiosInstance from '../../features/auth/AuthInstance';
import './BookDetail.scss';

const BookDetail = () => {
  const { id } = useParams();
  const { themes, currentSeason } = useThemeStore();
  const currentTheme = themes[currentSeason];
  const [bookData, setBookData] = useState(null);
  const [comments, setComments] = useState([]);
  const [newComment, setNewComment] = useState('');
  const [editingComment, setEditingComment] = useState(null);
  const [updatedContent, setUpdatedContent] = useState('');

  useEffect(() => {
    axios.get(`http://127.0.0.1:8000/api/books/${id}/`)
      .then(response => {
        setBookData(response.data);
      })
      .catch(error => {
        console.error('Error fetching book data:', error);
      });

    axios.get(`http://127.0.0.1:8000/api/books/${id}/comments/`)
      .then(response => {
        setComments(response.data || []);
        console.log('comment :', response.data);
      })
      .catch(error => {
        console.error('Error fetching comments:', error);
      });
  }, [id]);

  const handleAddComment = async () => {
    try {
      const response = await axiosInstance.post(`http://127.0.0.1:8000/api/books/${id}/comments/`, {
        content: newComment,
      });

      setComments([...comments, response.data]);
      setNewComment('');
    } catch (error) {
      console.error('Error adding comment:', error);
      alert('댓글을 추가하는 중에 오류가 발생했습니다.');
    }
  };

  const handleEditComment = async (commentId, updatedContent) => {
    try {
      const response = await axiosInstance.put(`http://127.0.0.1:8000/api/books/${id}/comments/${commentId}/`, {
        content: updatedContent,
      });

      setComments(comments.map(comment => comment.id === commentId ? response.data : comment));
      setEditingComment(null);
      setUpdatedContent('');
    } catch (error) {
      console.error('Error editing comment:', error);
      alert('댓글을 수정하는 중에 오류가 발생했습니다.');
    }
  };

  const handleDeleteComment = async (commentId) => {
    try {
      await axiosInstance.delete(`http://127.0.0.1:8000/api/books/${id}/comments/${commentId}/`);
      setComments(comments.filter(comment => comment.id !== commentId));
    } catch (error) {
      console.error('Error deleting comment:', error);
      alert('댓글을 삭제하는 중에 오류가 발생했습니다.');
    }
  };

  return (
    <div className="book-detail" style={{ color: currentTheme.textColor }}>
      {bookData && (
        <div className="summary" style={{ backgroundColor: currentTheme.buttonBackgroundColor }}>
          <h1>{bookData.title}</h1>
          {/* <img src={bookData.image} alt={bookData.header} /> */}
          {/* <p>{bookData.content}</p> */}
          <p>{bookData.user_nickname}</p>
          <p>{bookData.is_liked.length}</p>  {/* 배열의 길이로 좋아요 수 출력 */}
          <p>{bookData.average_rating}</p>
        </div>
      )}
      <div className="comment-box">
        <h2>Comment Box</h2>
        <div className="comments">
          {comments.map((comment, index) => (
            <div className="comment" key={index}>
              <img src="https://via.placeholder.com/50" alt="User" />
              <p>{comment.content} <br />{comment.user_nickname} <small>on {comment.created_at}</small></p>
              <button onClick={() => {
                setEditingComment(comment.id);
                setUpdatedContent(comment.content);
              }}>Edit</button>
              <button onClick={() => handleDeleteComment(comment.id)}>Delete</button>
            </div>
          ))}
        </div>
        {editingComment && (
          <div>
            <textarea
              value={updatedContent}
              onChange={(e) => setUpdatedContent(e.target.value)}
            ></textarea>
            <button onClick={() => handleEditComment(editingComment, updatedContent)}>Save</button>
            <button onClick={() => setEditingComment(null)}>Cancel</button>
          </div>
        )}
        <textarea
          placeholder="Your comments"
          value={newComment}
          onChange={(e) => setNewComment(e.target.value)}
        ></textarea>
        <button style={{ backgroundColor: currentTheme.buttonBackgroundColor, color: currentTheme.buttonTextColor }}
          onClick={handleAddComment}> Add </button>
      </div>
    </div>
  );
};

export default BookDetail;
댓글 수정, 삭제 로직을 추가하고 수정할 때 버튼 클릭해서 수정, 취소 버튼이 나오게 해준다.
삭제 할때 에러 메세지 발생!

이런 에러가 떠서... 뭘 못받고 있는거지 하고 보니까 book_id 를 못받고 있었다.

백엔드에서는 이런 메세지를 보내고 있었다.
그래서 books/ views.py 에서 수정을 해주어야 했다. book_id 를 delete 부분에 추가해주어야 삭제가 된다.
class CommentDetailAPIView(APIView):
    def put(self, request, book_id, comment_id):
        comment = get_object_or_404(Comment, id=comment_id)
        serializer = CommentSerializer(comment, data=request.data, partial=True)
        if serializer.is_valid(raise_exception=True):
            serializer.save()
            return Response(serializer.data)

    def delete(self, request, book_id, comment_id):
        comment = get_object_or_404(Comment, id=comment_id)
        comment.delete()
        return Response("NO comment", status=204)